
Compositing VRay render passes is an important subject for the purposes of both quality and flexibility in our compositing workflow. Being able to adjust colours, reflections and even individual lights in the scene long after the render is complete is not only exceptionally powerful, but also sometimes necessary for speedy turnaround on client changes. In this tutorial I’m going to get straight to point with quick yet powerful formulas for advanced render element compositing in After Effects using VRay for 3ds Max. The same principles will apply to other compositing and 3D packages as well. We’ll start off with a basic composite using only 5 passes and further on we’ll tackle an advanced method using 13 render elements.
Linear Workflow
The first step is to set up our linear workflow. This is a necessary evil for all rendering and should be adhered to whether you’re rendering in passes or not. I won’t go into why we have to do gamma correction, just how we do it.
Open up the Gamma and LUT settings from the Rendering menu in 3ds Max and check the following: “Enable Gamma/LUT Correction”, set the gamma to 2.2, check both “Materials and Colors” boxes, and set the bitmap input gamma to 2.2 and it’s output to 1.0.
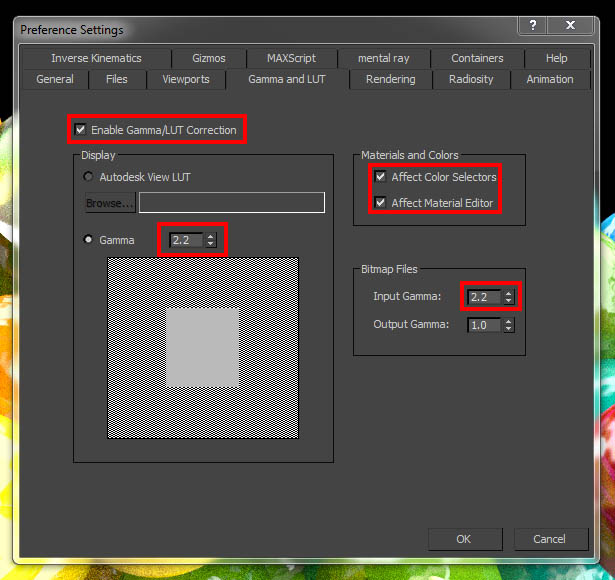
If in doubt, use 2.2.


Setting up refractive materials
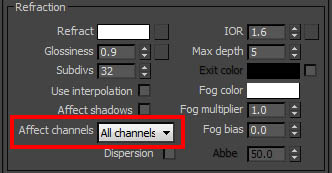
If you’re rendering refrative materials like glass or water against a plain environment background you may have issues with the alpha channel for transparent objects. To fix this we need to change the affect channels setting in our transparent material under the refraction section to “All channels”.
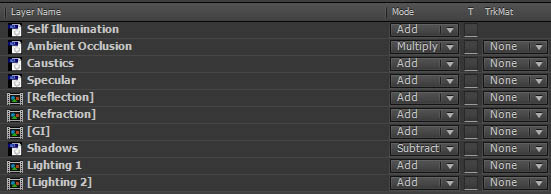
Setting up VRay render elements
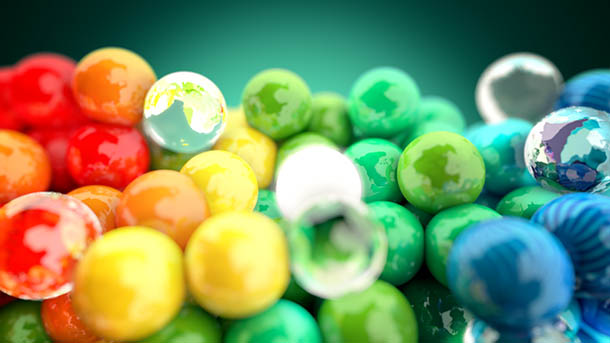
Now we’re ready to get to down to business. I’ve got a basic scene with some shiny coloured balls, glass, self illumination and some textured balls to cover most situations in one scene. It is lit by two lights, GI and an HDRI reflection. Go over to your render elements tab in the render settings dialogue and let’s add the following render passes for a basic composite. We’ll get to an advanced composite using many more layers later on.
- VRayReflection
- VRayRefraction
- VRaySpecular
- VRayGlobalIllumination
- VRayLighting
These are the render passes required to recreate any given beauty pass. But for this scene we also need to add:
- VRayCaustics
- VRaySelfIllumination
Evaulate your scene to determine which additional passes you may need. In this scene I have glass materials creating caustics and a VRay light material casting self illumination and so I need those elements to recreate the beauty pass. Your scene may not need them or it may need others like VRaySSS2 for sub-surface scattering.
We also want to setup the VRay frame buffer to save a separate colour and alpha channel for us. To do that we simply check “Save separate render channels”, tick all the boxes and choose where to save the files. This also solves the problem of VRay not saving render pass files.

Taking the render elements into After Effects
Now we can begin our basic comp in After Effects. To begin we need to set up our project. Create a 16 bit composition and in the project settings window (click on 16 bpc) change the working space to sRGB and check the “Linearize working space” box.


Alternative gamma correction: If you find that your 8-bit layers are a little bright there is an alternate method to correct the gamma for your render elements only. Simply set your After Effects project settings to the following:

Then use an adjustment layer above all your of your render elements and apply an Exposure effect (Effects -> Colour correction -> Exposure).

Set the Gamma Correction to 2.2.

Advanced VRay render elements compositing
If everything went well with your basic composite then you’re ready for more complex render passes. Let’s go back to 3ds Max and use the following render passes:
- VRayCaustics
- VRaySelfIllumination
- VRayShadows
- VRaySpecular
- VRayLightSelect
- VRayExtraTex (Ambient occlusion)
- VRayZDepth
- VRayDiffuseFilter
- VRayRawGlobalIllumination
- VRayRawReflection
- VRayReflectionFilter
- VRayRawRefraction
- VRayRefractionFilter
Some of these require a little more setup:
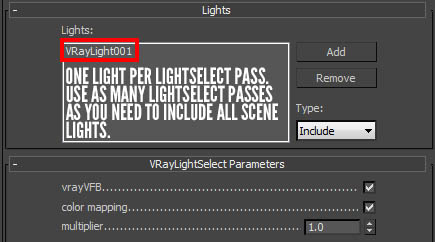
VRayLightSelect
This incredibly powerful pass let’s us control our lighting in After Effects or any other compositing package.
Start by adding as many LightSelect passes as you have lights or for as many groups of lights as you’d like to control. I have two lights in my scene that I want to control separately so I have two VRayLightSelect passes, you can add as many as you need by simply adding more as you would any other pass. Select the light or group of lights you’d like to control with each render element.
It’s important that you include all your lights in these elements as we’ll be recreating our VRayLighting element with these passes. VRayLightSelect passes are regular VRayLighting elements for selected lights only. Add all your lights to LightSelect passes, add all the passes together and you’ll have the same result as a VRayLighting pass.
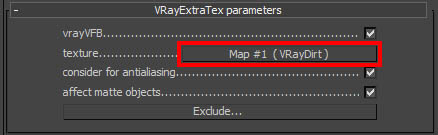
VRayExtraTex
This will be our ambient occlusion pass. Place a VRayDirt map into the texture slot and play with the radius settings of the VRayDirt to suit your scene.
VrayZDepth
Use the tape measure tool in Max to determine the distance of the closest and furthest objects in your scene. Use those values as your minimum and maximum distances in the VRayZDepth pass settings. Many also believe that ZDepth passes should be unfiltered (aliased) but your mileage may vary depending on the scene.

Advanced VRay render elements composite
The difference between this advanced composite and the basic formula is that we’ll be using raw render elements to create our base passes. For instance using VRayRawReflection and VRayReflectionFilter to create a VRayReflection pass. We’ll also use additional elements like shadows, ambient occlusion, zdepth and more. Below is a flow chart of how we’ll be compositing these passes:

VRayReflection = VRayRawReflection*VRayReflectionFilter (Order does not matter when all blending modes are set to multiply inside a pre-comp)


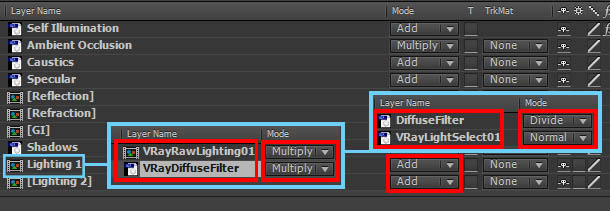
Using VRayLightSelect passes
LightSelect passes are very powerful so I’m going to make sure I cover how to comp them correctly. In my scene I have two lights separated into two VRayLightSelect passes. Each LightSelect element equals a VRayLighting element for that light only. Therefore:
VRayLighting = VRayLightSelect01 + VRayLightSelect02 (Use “Add” blending mode)

To create a RawLighting element from our LightSelect pass we divide it by our DiffuseFilter:
‘VRayRawLightSelect’ = VRayDiffuseFilter/VRayLightSelect (DiffuseFilter MUST be on top and set to “Divide”)

VrayLighting01 = ‘VRayRawLightSelect’*VRayDiffuseFilter (Both set to “Multiply)


VRayLightSelect01 = ‘VRayRawLightSelect'(VRayDiffuseFilter/VRayLightSelect01)*VRayDiffuseFilter
VRayLightSelect02 = ‘VRayRawLightSelect'(VRayDiffuseFilter/VRayLightSelect02)*VRayDiffuseFilter
VRayLighting = VRayLightSelect01 + VRayLightSelect02
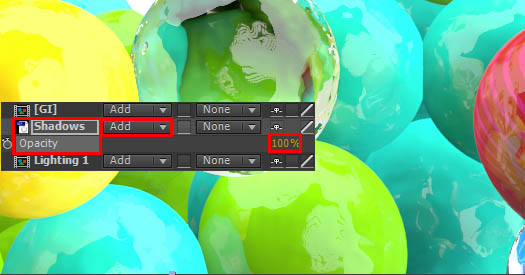
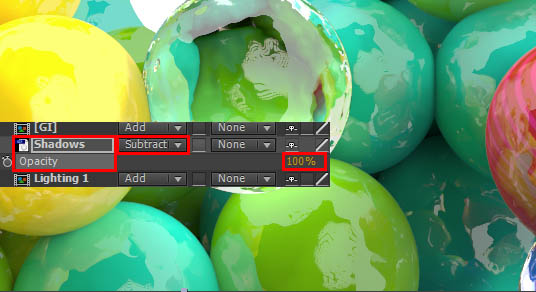
Using the VRayShadows and ExtraTex elements
Compositing the VRayShadows and ambient occlusions passes are a little different from our other layers. They will be using different blending modes which means their order is important. VRayShadows can also be used in two different ways.
By default your VRayShadows pass should be composited above your Lighting passes which should be at the very bottom of your comp. We can use VRayShadows in either “Add” or “Subtract” depending on what we want to do and the layer should be turned off if you do not want to modify the shadows in the image.
Turning VRayShadows off will leave shadows in the image unaltered.


Moving onto our ambient occlusion pass I originally placed my ExtraTex layer on top of everything but below my SelfIllumination element. I’ve now revised that to placing the ExtraTex layer on top of everything in the comp and setting it to “Multiply”. This gives my glowing sphere a little bit of shading. These positions aren’t set in stone so if you find something that gives you a look that you’re liking then go with it. This is part of why we’re rendering out all these layers to begin with.

Beauty Pass = ((VRayDiffuseFilter/VRayLightSelect01)*VrayDiffuseFilter) + ((VRayDiffuseFilter/VRayLightSelect02)*VrayDiffuseFilter) + or – VRayShadows + (VRayRawGlobalIllumination*VRayDiffuseFilter) + (VRayRawRefraction*VRayRefractionFilter) + (VRayRawReflection*VRayReflectionFilter) + VRaySpecular + VRayCaustics * VRayExtraTex + VRaySelfIllumination
*Phew!*
Correcting the alpha channel and using VrayZDepth
Our main comp is now complete. Precomp all of your elements so far into one layer and place your separated alpha channel element above it. Set your main precomp to use the alpha layer as a luma or alpha matte. I also find it beneficial to uncheck “Preserve RGB” in the interpretation of the alpha channel only but your mileage may vary.


Making adjustments to the composite
At this stage everything is primed and ready to be tweaked and edited to our hearts content. There is a limitless amount of possibility so I won’t cover all the things you can do with these layers but here are a few ideas:
- Use opacity values on layers to decrease their effect. Reducing the reflection pass for instance reduces the intensity of the reflections. Reducing opacity on one of our LightSelect composites decreases the intensity of that one light only.
- Use curves to adjust colours of reflections, shadows and GI.
- Duplicate layers to increase their effect or use Levels on VRayReflectionFilter and VRayRefractionFilter elements.
- Use Hue/Saturation effects on VRayDiffuseFilter passes within our GI and Lighting elements to change the colours of objects in our scene. Use the same effect on VRayRawReflections and VRayRawRefractions.
- Add a glow to the SelfIllumination layer.
I’ve done those exact things with some grading to complete this simple image. It’s now up to you to experiment and discover all the incredible things rendering in passes can do for you!
Before
After
Elvin
Wow such a detailed tutorial, thank you !
Steven Olver
You’re welcome Elvin, I hope it helped you!
stoneman3d
thanks very good and detailed tutorial
thanks again!!!!
eric
thanks lot!! very helpfull!
i have only one problem with interior scene:
option “all channel” is activate for glass window and there is still difference between beauty pass. behind the window there are table and chairs and trees and still have problem with them…. only way is to put option to “color + alpha” but i loose information in the lighting pass for all objects behind the windows…any idea?
best regards
herve
Very very helpful, thank you very much for your time ! 🙂
mailo
many many thanks, like it! serving veeery good 🙂
Matt
Thanks, really nice tuts ! Why using 16b EXR ? By doing this you lost 50% of deep color calculated by VRay, you should use 32b EXR (Full Float mode) and setup AE in 32b too 😉
Steven Olver
Hey Matt, you’re right of course in the colour loss but don’t forget there are pros and cons of both. There may or may not be storage concerns for the full float sequences but more importantly, many plugins and effects won’t work in 32bbp comps in After Effects. 16bpp is a nice all rounder and still contains more than enough colour information for all but the most drastic of alterations 🙂
Panos
Hi Steven
Thank you for spending the time to post this tutorial. The gamma workflow is in line with how we work. in max design 2014 the Gamma and LUT panel has changed a bit as shown in this post.
http://www.neilblevins.com/cg_education/linear_workflow_vray_max/linear_workflow_vray_max.htm
but my question is not about Gamma or compositing. Is it possible to retrieve data through glass when rendering. Specifically render elements such as an RGB multimattematerial. The most common solution is to render twice, with and without glass. This seams a bit draconian, I know in mental ray you can tell glass not to be visable in an AO shader. But im looking for solutions for glass to not effect all elements if possible.
Hope there is food for thought there for you or anyone else.
Panos
Circlenumber
Thank you. 🙂
Sanjay
The only real tut on the subject which turns out to be way more complicated than I had hoped. Thanks very much Steven. It’s very clear and detailed.
Sanjay
hey Steven, vray reflection = vray raw ref x vray refln filter right?
its not happening in my case.. can I send you the lores renders?
Steven Olver
That’s correct Sanjay, have you made sure to set the blending modes on both (just for safety’s sake) to multiply and precomped them? Then set the precomp’s blending mode to add like a normal pass layer and it should definitely come out correct.
If it’s still not coming out right there might be something wrong with the actual rendered passes.
simon
If I do everything right, the image should look too dark, even when the sRGB button in the frame buffer is pressed. Is that right?
Tim
Thanks Steven for a great tutorial, been looking for this info for a while! I’ve seen the comps in Nuke and never really knew how to put it together in AE.
Once you have set up this file, is it possible to create a script in AE to look for the element name suffix and create your basic comp without having to re create every time?
I know vray pretty well and my AE comps haven’t followed the proper linear method, more just using the beauty pass and screening elements as i need, not perfect but it kind of works!
thanks again, Tim
Stephen
Ah! I can’t get my Vray frame buffer to look the same in After effects. When I apply the sRGB it makes the image look terrible!
FG
Hey, very nice tut.
There’s just one, very big, issue. If you’re trying to isolate the refraction pass in order to get it right in the comp, you DON’T have to select ‘all channels’ in the affect rollout in refractive materials. otherwise your reflective pass will be “integrated” in the vrayglobalillumination pass and you won’t be able to have an exaxt comp (you’ll have to get rid of your vrayrefraction pass, thus spoiling the usefulness of the entire compositing).
Krakatoa compositing tips | Pio Raffaele Fina
[…] the refl./refr. pass to WireColor for masking and the essential ZDepth! Some time ago I found a very interesting article about advanced compositing with V-ray that talked about the VrayLightSelect and the possibility to […]
Marcus
Awesome tutorial. You covered a lot of stuff:)
Vu Pham
Great tutorial on pass seperate and element blending. Great detail work.
Thank you,
Stephen
Thank you so much for this tutorial, absolutely perfect and detail guide. Nothing like this online, have looked a lot.
One question and I may be doing something wrong, if you have refractive material in the scene and you render a zpass, is that calculated on the material position still or will the greyscale calculate through the refractive glass to the objects behind. Hope that makes sense. I am having trouble correctly calculating this element for post dof. Would the setting for All Channels in refraction slot fix this?
Thank you again
Steven Olver
Hey Stephen thanks for the compliments 🙂
You’re not doing anything wrong at all, it’s just that a Z-depth pass won’t honour transparency due to the way it works. I’m not 100% sure on a solution for this (at least not an easy one) but I’ve heard VRay 3 may have a simple solution for z-depth and refraction.
Otherwise you would have to build your own z-depth pass using a material with a gradient, mapped to the whole scene for all objects other than your refractive ones which will retain their refractive material. You might also have to fiddle with your refractive material to get rid of all reflections and other diffuse properties.
A simple but taxing solution would be to use camera DoF. You’ll usually find the quality of 3D DoF to be better anyways and it can track the look at point of the camera as well. If it works for your camera move and you’ve got some render time to burn I would just do that. Solves everything in one go 🙂
Stephen
Thank you for that’s awesome to know, I really appreciate your help on this. Will go give it crack. I’ll also look into if there is a v3 setting to handle and give a shout back if I find anything. Will be useful to share on here.
Many thanks, really great job with the article.
Ben
Steven,
Thank you for taking the time to explain everything so clearly. I have a question about the general use of AE as the compositing tool as opposed to Photoshop. I see lots of tutorials using AE, and wondering what the benefit is as opposed to Photoshop.Is this because the intent is to then produce an animation? It seems if your goal was a still image it would be difficult to add people, background elements, etc etc. in AE. In PS you have quick access to a mask for each layer. To do the same in AE I think you’d have to create the mask in PS anyway, then import it and use it as a luma matte, no?
Thanks!
-Ben
Steven Olver
Hey Ben, while the tutorial made use of still images for demonstration purposes, you’re right – After Effects and this tutorial were focused on use for animation, VFX compositing and so forth.
For still images, if Photoshop is your go to tool then that’s the place to do it 🙂 Many of the blending modes and layer compositing formulas will still translate into Photoshop however.
Ben
Awesome. Thanks so much!
Chiel
Working on the basic part of the tutorial, but i run into something weird. I’m using Populate and Forest Pack in 3DS Max, in the Global Illuminiation pass the Populate characters and some of the plants of the Forest Pack object turn out gray-ish (Like a standard material, but colored ever so slightly). In the lighting pass they render fine.
When i add these together in AE, the objects still turn out gray. I’ve checked the settings in Max, all the objects are set to receive light so i’m not sure what the cause of this problem is. Maybe you have an idea?
I’ve found a (temporal) solution, which is adding the RGB pass and set it to darken, but i’m not sure this will work for all future projects if this problem happens again.
Would love to hear any insights you might have on this 🙂
Chiel
Update: Problem is fixed. It turned out that some of the materials where not Vray materials. I changed them to Vray materials and everything works how it is supposed to work now.
Eduardo
Vray2SidedMtl doesnt appear correct when composing. It look like they loose the translucent (and the vraySSS2 its All Black). Im using a hdri dome Light.
Ruan
Hi – Great tutorial helped me a lot!
I did run into an issue and would be great if anyone can assist me…
I am trying to render a scene with matte shadows – compositing on live action footage. When I export my Vray Shadow pass it does not composite correctly. If I use a normal object as my floor then all works correctly.
So whenever I import my footage and exr into AE, and try to tweak my shadows using ADD it goes “all white / grey” instead of disappearing at 100%.
Any ideas?
Thanks!
Ruan
Steven Olver
Hey Ruan, without looking at your scene could it be something to do with the alpha contribution? Try values of 1, 0 and -1 and see if anything changes. Failing that it might be necessary to render out a completely separate shadow layer that isn’t part of the normal render elements. It’s a bit of extra setup but it will give you a correct shadow. If you have VRay 3.0 then the render mask: selected option will help to render out only the floor with the shadow on it and nothing else.
Ruan
Hi Steven,
Many thanks for the reply – will give that a try. It’s strange as this only happens to a shadow on a matte material if that makes sense.
I do have Vray 3 and have never used render mask – where do I find that option and do I then exclude all other objects to isolate the floor with the shadows?
I would have been so much easier if they included a way to render a pass without any shadows and a pass with the shadows haha 🙂
Thanks again
Ruan
Steven Olver
You’ll find the render mask in your render settings (F10) under image sampler. Which is a bit counter intuitive as it has nothing to do with sampling!
Change it from none to selected then select your floor in your scene. When you render with this option set like this only the floor will be rendered and it will be perfectly matted by any objects in front of it. If you’re rendering an animation you’ll also want to go to the system tab in your render settings and set ‘Previous render’ to ‘clear’.
Do this floor pass without your render elements and don’t composite it along with your render elements like you would your regular shadow element. Treat it like a normal layer that you’re compositing with.
Hope that sorts you out!
Ruan
Thanks!! Will give that a go!
Josh
One year later… Should after re-combination in after effects your render look exactly as it would have in the vray frame buffer? Great tut by the way. Thanks.
Steven Olver
Yes it should look the same. If it looks different it could mean a discrepancy in colour spaces, for example selecting the incorrect working colour space in After Effects. I should update the tutorial at this stage because the workflow has become much easier. All we need to do now in AE is change the working colour space to sRGB and linearize the working space. Done! VRay works in linear colour space by default in 3ds Max now as well.
Jamie
Excellent tutorial and many thanks for taking the time to document it – I believe it has made me up my game as an artist.
I am just having a slight issue with my renders currently – I am rendering a vehicle and compositing it onto a BG plate in AE. Everything is fine except for the glass in the vehicle, such as the windshield. With the default settings of my glass material – you can see the interior of the car fine – but the glass is opaque and I cannot see the BG plate. My other option is to change the material to affect all channels – but then the alpha is cutting out all of the elements behind the glass such as the steering wheel and roll cage. Any ideas?
Kind regards,
Jamie
Steven Olver
Hey Jamie, if your refraction is set to all channels or color+alpha then your alpha channel should be correct. Once you apply the alpha channel as a matte to your composited passes everything should look correct. If your alpha channel doesn’t show any grey where your windscreen is then something is wrong. Check that your VRay object properties don’t have the windscreen set to matte object or an alpha contribution of -1.
Bruno
Hello Steven, awesome tutorial!
Do you know why the render elements render the passes without the alpha channel?
For instance when you shuffle out the VRay Reflection in Nuke, i can’t do an unpremult because the pass doesn’t have the alpha channel. Nuke assumes that the alpha is the blue channel.
Do you know how to fix that?
ps: i don’t save the passes in split files, i rather use the first save option in the vray frame buffer tab in EXR multipasses files.
Thanks in advance
Steven Olver
Hey Bruno, I think that’s normal for the passes not to have alpha. If you’re doing it in Nuke though you should be able to plug the alpha into each pass as needed since you’ll have separate nodes for each one.
3Dvs3D
Before looks nice